vendredi 15 septembre 2017

Use java jarsigner to self sign your java archive

Use jar signer to sign your java archive

Some applications or browsers security require that any jar you try to use must be signed. 
You can use java tool jarsigner to self sign your own jar files. 

First, you need to create your certificate or use your existing certificate. 

Create your own certificate

-    To create you own certificate, run the following command :

C:\Java\jdk1.8.0_92\bin\keytool.exe -genkeypair -alias ddy -keyalg rsa -keysize 2048 -keypass ddy1234 -validity 3650 -keystore C:\temp\mykeystore.jks -storepass ddy1234 -storetype jks -dname "CN=DDY,OU=OC,O=DDY,L=Paris,ST=IDF,C=FR" -v
Generating 2 048 bit RSA key pair and self-signed certificate (SHA256withRSA) wi
th a validity of 3 650 days
        for: CN=DDY, OU=OC, O=DDY, L=Paris, ST=IDF, C=FR
[Storing C:\temp\.keystore]


Use jarsigner 

- Use your certificate with jarsigner to sign your java archive : 

C:\Java\jdk1.8.0_92\bin\jarsigner -keystore C:\Temp\mykeystore.jks pdev.jar ddy 
Enter Passphrase for keystore: 
jar signed.


jeudi 14 septembre 2017

SSL Configuration on Weblogic

This article decribes all steps to configure SSL on Weblogic Server.
For a Weblogic Cluster, these steps must be configured for each cluster member.

1.    Configure java stores

To configure java stores (keystore for storing certificate, truststore for Certification Authorities), follow these steps :
Connect to Weblogic Admin Console (click Lock & Edit in production mode) :
-                     Go to “Environment / Servers / <ServerName> »
-                     Go to “Configuration / Keystore” tab.
-                     click on “Change” button.


-                     Select “Custom Identity and Custom Trust” in "keystore" list, then click on “Save”
Note : If certificates are provided by a well-known CA, use « Custom Identity and Java Standard Trust ».


-                     Make the following changes :
o        Custom Identity Store : « /u01/app/security/mykeystore.jks” (store previously created)
o        Custom Identity Keystore Type : « JKS »
o        Custom Identity Keystore Passphrase : <password for the keystore> (password used during java keystore creation)
o        Confirm Custom Identity Keystore Passphrase : <password for the keystore>
o        Custom Trust Keystore Passphrase : <password for the truststore> (password used during java truststore creation)
-                     Confirm Java Standard Trust Keystore Passphrase : <password for the truststore>
-                     Click on “Save”


-                     Click on « Activate changes ».

2.    SSL Configuration

To configure SSL using keysotres previously installed : 

-                     Go to «  Environment / Servers / <ServerName> »
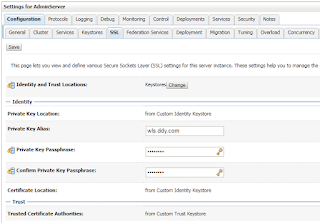
-                     Click on «  Configuration / SSL » tab
-                     Apply the following modifications :
o        Identity and Trust Location : Keystores (default)
o        Private Key Location : from Custom Identity Keystore (default).
o        Private Key Alias : « alias used for the key ». (use the value when adding certificate to keystore).
o        Private Key Passphrase : « password used when creating the key alias ».
o        Confirm Private Key Passphrase : « password used when creating the key alias »
-                     Click on “Save”.
Note : Passphrase cannot be empty, if not added during creation, use keytool to add a passphrase.


-                  Click on « Activate changes ».


3.   Hostname Verification


It can be usefull to disable hostname verification (only for testing purpose, not recommanded for production).

Weblogic doesn't allow certificate not matching hostname by default. 
To disable hostname verification.
-                     Go to “ Environment / Servers / <ServerName> »
-                     Click on « Configuration / SSL» tab
-                     Click on “Advanced” section and make the following changes :
o        Hostname Verification : « NONE »
o        Custom Hostname Verifier : Leave empty
-                     Click on  “Save”

-                     Click on « Activate Changes. »

Note : To use certifcates using Wildcards, you can use a Custom Verifier :
Example : *.ddy.com
-                     Go to “ Environment / Servers / <ServerName> »
-                     Click on « Configuration / SSL » tab
-                     Click on “Advanced” section  and set the following values :
o        Hostname Verification : Custom Hostname Verifier
o        Custom Hostname Verifier : weblogic.security.utils.SSLWLSWildcardHostnameVerifier
-                     Click on  “Save”

-                     Click on « Activate Changes. »

Generate SSL certificate using keytool

This article describe steps to create a SSL certificate using java keytool. 

1.1    Generate keypair

Keytool binary is a java tool provided by JDK/ JRE ($JAVA_HOME/bin)
-                     To create a keypair using java keytool (only if using well-known CA) :
${JAVA_HOME}/bin/keytool -genkeypair -alias wls.ddy.com -keyalg RSA -keysize 2048 -validity 3650 -keypass password_1 -keystore /u01/app/security/Identity.jks -storepass password_1
What is your first and last name?
  [Unknown]:  wls.ddy.com
What is the name of your organizational unit?
  [Unknown]:  IT
What is the name of your organization?
  [Unknown]:  DDY
What is the name of your City or Locality?
  [Unknown]:  Paris
What is the name of your State or Province?
  [Unknown]:  IDF
What is the two-letter country code for this unit?
  [Unknown]:  FR
Is CN=wls.ddy.com, OU=IT, O=DSI, L=Paris, ST=IDF, C=FR correct?
  [no]:  yes

-                     To create CSR to send it to PKI (internal or CA) :
${JAVA_HOME}/bin/keytool -certreq -alias wls.ddy.com -file wls-csr.pem -keystore /u01/app/security/Identity.jks
Enter keystore password:

-                      Send .pem file to your CA to ask your certificate.

1.2    To create a self-signed certificate

To create a self-singed certificate, use the following command :
${JAVA_HOME}/bin/keytool -genkey -noprompt -trustcacerts -alias wlssvr -dname "CN=wls.ddy.com,OU=IT,O=DDY,L=Paris,ST=IDF,C=FR" -keypass ovsroot -keystore /u01/app/security/mykeystore.jks -storepass ovsroot -keyalg RSA

1.3    Export certificate

To be able to import your CA in truststore, you need to export it first :
${JAVA_HOME}/bin/keytool -export -alias wlssvr -keypass ovsroot -keystore /u01/app/security/mykeystore.jks -storepass ovsroot –file mycert.cer

1.4    Add your CA to custom java TrustStore

Add your CA to a custom or existing truststore is a mandatory step to authorize Weblogic Server to use this certificate and to avoid Handshake errors
-    To add certificate CA to a truststore :
#  ${JAVA_HOME}/bin/keytool -import -v -trustcacerts -alias mywlsserver -file mywlsserver.cer -keystore /u01/app/security/myTrust.jks -keypass changeme -storepass changeit
Certificate was added to keystore
[Storing SoaTrust.jks]

${JAVA_HOME}/bin/keytool -import -v -trustcacerts -alias mywlsca -file mywlsca.cer -keystore /u01/app/security/myTrust.jks -keypass changeme -storepass changeit
Certificate was added to keystore
[Storing SoaTrust.jks]

${JAVA_HOME}/bin/keytool -import -v -trustcacerts -alias myca -file myca.cer -keystore /u01/app/security/myTrust.jks -keypass changeme -storepass changeit
Certificate was added to keystore
[Storing SoaTrust.jks]

When adding a CA to a trustsotre, it is mandatory to add ROOT CA and any intermediate CA. .

The provided exemple shows how to add a certificate isssued by mywlsca depending of root CA myCA. 

jeudi 25 juin 2015

Create a Yum repository on Exalogic 2.0.6.2.x

This document describes how to create a yum repository on ZFS Storage inside an Exalogic machine.

Prepare your environment

Create a zfs share

Connect to one of the storage server to create a share.
This share hosts the Exalogic yum repository.
  • Connect to storage server

Add Share to project

  • Create a share named ‘yum-repo’ on common project

Add permissions on share

  • Add Nfs Exception to access the share from IPoIB-vserver-shared-storage network.
  • Add read/Write and root access.

Prepare repository

Mount ‘yum-repo’ share on a vServer

- Edit /etc/fstab and add a entry :
172.17.0.5:/export/common/yum-repo /export/common/yum-repo nfsv4 rw,bg,hard,nointr,rsize=131072,wsize=131072 0 0
With 172.17.0.5 is the IPoIB address of the storage server on IPoIB-vserver-shared-storage

  • Create directory /export/common/yum-repo
# mkdir –p /export/common/yum-repo

  • Mount directory on vServer :
# mount /export/common/yum-repo

Prepare files


  • upload Oracle Enterprise Linux iso file in the share :
With your favorite scp client, copy Oracle Enterprise Linux iso file to /export/common/yum-repo.

  • Create temporary directory and repository version directory :
# mkdir –p /export/common/yum-repo/tmp /export/common/yum-repo/OEL_6.5

  • mount iso file on the temporary directory :
# mount -o loop /export/common/yum-repo/OEL_6.5.iso /export/common/yum-repo/tmp

  • Copy iso content in repository directory :
# cp -r /export/common/yum-repo/tmp/* /export/common/yum-repo/OEL_6.5

Create your repository

  • To create repository, you must install createrepo package.
This package can be found on temporary directory previously created

Control if already installed :
# rpm –qa |grep createrepo
createrepo-0.4.11-3.el5

  • Install package :
# rpm –Uvh /export/common/yum-repo/tmp/createrepo-0.4.11-3.el5.x86_64.rpm /export/common/yum-repo/tmp/deltarpm-* /export/common/yum-repo/tmp/python-deltarpm-*

  • At this step, remove any link to Packages directory in subdirectories to avoid loop in repository :
# find . -name Packages -type l -exec rm -f {} \;

  • Create repository :
# cd /export/common/yum-repo/OEL_6.5/
# createrepo .
3380/3380 - Cluster/ipvsadm-1.24-13.el5.x86_64.rpm pmpmx86_64.rpm
Saving Primary metadata
Saving file lists metadata
Saving other metadata

Cleanup environment

  • Unmount iso file :
# cd /export/common/yum-repo/
# umount –f /export/common/yum-repo/tmp/

  • Delete iso file :
# rm -f /export/common/yum-repo/OEL_5.8.iso

Configure yum client

Update configuration files

  • Update /etc/yum.conf file :
Add exclusion to Exalogic specific package which cannot be updated:
exclude=kernel* compat-dapl* dapl* ib-bonding* ibacm* ibutils* ibsim* infiniband-diags* kmod-ovmapi-uek* libibcm* libibmad* libibumad* libibverbs* libmlx4* libovmapi* librdmacm* libsdp* mpi-selector* mpitests_openmpi_gcc* mstflint* ofed* openmpi_gcc* opensm* ovm-template-config* ovmd* perftest* qperf* rds-tools* sdpnetstat* srptools* xenstoreprovider* initscripts* nfs-utils*

  • Create /etc/yum.repos.d/local_yum.repo file with the following content:
[local_yum]
name=Exalogic Yum Rack
baseurl=http://172.17.0.5/shares/export/common/yum-repo/OEL_6.5.iso
gpgcheck=0
enabled=1

Refresh yum database

Refresh yum client on each machine now configured with the local repository.
  • First, clean yum cache :
# yum clean all
Loaded plugins: rhnplugin, security
Cleaning up Everything

  • Recreate yum cache and headers :
# yum repolist
Loaded plugins: rhnplugin, security
This system is not registered with ULN.
ULN support will be disabled.
local_yum | 951 B 00:00
local_yum/primary | 1.4 MB 00:00
local_yum 3380/3380
Excluding Packages from Exalogic TVP yum rack
Finished
repo id repo name status
local_yum Exalogic TVP yum rack 3,288+92
repolist: 3,288

Now, you can install packages with yum install command.

mercredi 3 juin 2015

How to configure a internal dns for Exalogic system :

Prerequisites
Packages
Following package are necessary for dns Server :
bind
Following package are necessary for testing dns client :
bind-utils

Installation 
On DNS server : 
On domain Name server, installation can be made with yum repository.
- To install named, execute the following command :
# yum install bind –skip-broken

Note : '--skip-broken' option is added to do not upgrade packages dependencies.

- To configure named as a service :
# chkconfig named on

- To start named service :
# service named start

On clients :
On every clients :
bind-utils package installation can be made with yum repository.
To install named, execute the following command :
# yum install bind-utils

Configure named
These actions must be made only on vServer host named service
/etc/named.conf
- Create a file /etc/named.conf with the following content :

options {
        directory "/var/named";

        # hide version string for security
        version "not currently available";

        # Listen to the loopback device and internal networks only
        listen-on { 127.0.0.1; 172.16.0.100; 172.17.0.100; 192.168.0.100; 10.10.0.100; };
        #listen-on-v6 { ::1; };

        # Do not query from the specified source port range
        avoid-v4-udp-ports { range 1 32767; };
        avoid-v6-udp-ports { range 1 32767; };

        # forward all DNS queries to enterprise DNS
        forwarders { 172.30.121.25; 172.30.182.11; };
        forward only;

        # expire negative answers ASAP.
        # do not cache dns query failure
        max-ncache-ttl 1; # 1 seconds

        # disable non-relevant operations
        allow-transfer { none; };
        allow-update-forwarding { none; };
        allow-notify { none; };
};
zone "exa-admin.el01.com" in{
        type master;
        file "exa-admin.el01.com";
        allow-update{192.168.0.0/21; 10.10.0.0/24; 10.10.1.0/26; 10.10.1.64/26; 10.10.1.128/26;    };
        notify yes;
};

zone "exa-internal.el01.com" in{
        type master;
        file "exa-internal.el01.com";
        allow-update{192.168.0.0/21; 10.10.0.0/24; 10.10.1.0/26; 10.10.0.64/26; 10.10.0.128/26; };
        notify yes;
};

zone "168.192.in-addr.arpa" {
       type master;
       file "192.168";
       allow-update{192.168.0.0/21; };
        notify yes;
};

zone "0.17.172.in-addr.arpa" {
       type master;
       file "172.17.0";
       allow-update{172.17.0.0/16; 192.168.0.0/21; };
        notify yes;
};

zone "0.10.10.in-addr.arpa" {
       type master;
       file "10.176.40";
       allow-update{172.16.0.0/16; 192.168.0.0/21; };
        notify yes;
};

zone "1.10.10.in-addr.arpa" {
       type master;
       file "10.176.41";
       allow-update{172.16.0.0/16; 192.168.0.0/21; };
        notify yes;
};

This file creates an internal zone (exa-internal.el01.com) for IpoIB addressing and a zone (exa-admin.el01.com) for EoIB addressing.
The first one is exclusive in exalogic rack.
The second one is a sub-zone of global name service for company.

Internal IpoIB zone manages IpoIB-default network and IpoIB-vserver-shared-storage network.

For each zone, the reverse zone is managed too.

Zones files 
- Create file /var/named/exa-admin.el01.com :
$ORIGIN .
$TTL 172800 ; 2 days
exa-admin.el01.com IN SOA ns1.exa-admin.el01.com. root.exa-admin.el01.com. (
2003080803 ; serial
43200      ; refresh (12 hours)
900        ; retry (15 minutes)
1814400    ; expire (3 weeks)
10800      ; minimum (3 hours)
)
NS ns1.exa-admin.el01.com.
MX 10 ns1.exa-admin.el01.com.
$ORIGIN exa-admin.el01.com.
$TTL 172800 ; 2 days
ns1 A 192.168.0.100

- Create file /var/named/exa-internal.el01.com :
$ORIGIN .
$TTL 172800 ; 2 days
exa-internal.el01.com IN SOA ns1.exa-internal.el01.com. root.exa-internal.el01.com. (
2003080803 ; serial
43200      ; refresh (12 hours)
900        ; retry (15 minutes)
1814400    ; expire (3 weeks)
10800      ; minimum (3 hours)
)
NS ns1.exa-internal.el01.com.
MX 10 ns1.exa-internal.el01.com.
$ORIGIN exa-internal.el01.com.
el01sn-priv A 172.17.0.5
$TTL 172800 ; 2 days
ldap CNAME ldap-master
ldap-master A 192.168.0.100
ldap-slave A 192.168.0.200
ns1 A 192.168.0.100


Reverse zones files
- Create a file for each reverse dns, there is a sample file for one zone :
$ORIGIN .
$TTL 604800 ; 1 week
0.10.10.in-addr.arpa IN SOA ns1.exa-admin.el01.com. root.exa-admin.el01.com. (
3          ; serial
10800      ; refresh (3 hours)
3600       ; retry (1 hour)
604800     ; expire (1 week)
3600       ; minimum (1 hour)
)
NS ns1.exa-admin.el01.com.
$ORIGIN 0.10.10.in-addr.arpa.
$TTL 86400 ; 1 day

Clients
Configure name server 
On every clients :
- Configure /etc/resolv.conf
domain  exa-internal.el01.com
search exa-internal.el01.com exa-admin.el01.com mydomain.com
nameserver 192.168.0.100

- Configure /etc/nsswitch.conf
Be sure, that for host, you have configured :
hosts files dns

Nsupdate
Nsupdate is used to push or update informations about vServer.
There is a sample or script to execute to provide some informations.

# cat /tmp/nsreg.info
server 192.168.0.100
zone exa-internal.el01.com.
update delete myvserver-1.exa-internal.el01.com. A
update add myvserver-1.exa-internal.el01.com. 86400 A 192.168.0.10
send
server 192.168.0.100
zone 0.10.10.in-addr.arpa
update add 10.0.10.10.in-addr.arpa. 86400 IN PTR myvserver-1.exa-admin.el01.com.
send
zone 0.168.192.in-addr.arpa
update add 10.0.168.192.in-addr.arpa. 86400 IN PTR  myvserver-1.exa-internal.el01.com.
send

To execute the script :
# nsupdate -d -v /tmp/nsreg.info


Note : A script in /etc/rc.d/init.d/nsupdate can be used to update dns each time a vServer is rebooted.
This script can be added to OEL template.

jeudi 13 novembre 2014

Understand "Weblogic Plugin Enabled" attribute

Why using "Weblogic Plugin Enabled" :
Weblogic Server usually receives requests through a web server or a load-balancer which works as a proxy.
When using this kind of configuration, it is important to inform Weblogic Server of the presence of a proxy to handle the client request correctly.

Set the "weblogic plugin Enabled" attribute to true indicates to WLS to call getRemoteAddr and return the original request from the browser client instead of front WebServer address.

Example : 
One of the most representative example is when using Apache Server as a SSL termination in front of Weblogic.
In a simple case which consists to access to Weblogic console, we can observe weblogic behavior with and without "WL Plugin Enabled" attribute.

WL Plugin Enabled to false : 
When "Weblogic Plugin Enabled" is set to false, the redirect send to browser is rewriten in http on initial https port.


WL Plugin Enabled to true : 
When "Weblogic Plugin Enabled" is set to true, the redirect send to browser is rewriten correctly on https on the original port.


How to activate : 
"Weblogic Plugin Enabled" attribute can be set to three level.
- Domain Level (apply to all clusters and servers that do not overwrite explicitly the attribute with different value)
- Cluster Level (apply to all members of the cluster that do not overwrite explicitly the attribute with different value)
- Server Level

Domain Level : 
- Select Domain name :


- Select "Configuration" Tab, then "Web Applications" :


- Select "Weblogic Plugin Enabled" checkbox :


Cluster Level : 
- Expand "Environment" and select "Clusters", then click on your cluster :


- On "Configuration / General" Tabs, go to "Advanced" section, then select the value for "WL Plugin Enabled" attribute.
"Default" means that domain value apply.


Server Level : 
- Expand "Environment" in "Domain Structure" and select "Servers". Select the desired server :


- Select "Configuration / General" Tab :


- Expand "Advanced" section, then select a value for "Weblogic Plugin Enabled" attribute :


mercredi 12 novembre 2014

how to resize root '/' filesystem and swap on a Exalogic vServer.


Prerequisites
- Access to OpsCenter with owner of vServer.
- Access to vServer with root user.
- Access to a computeNode with root user.

Resize FileSystem
On vServer or OpsCenter :
Shutdown the vServer to extend main volume.
- Connect to OpsCenter
- Go to “Vdc Management / mycloud / Accounts / myAccount”
- Select the vServer
- Click “Shutdown the server” or click on the red square.
Alternative :
- Connect to vServer with root user and execute the following command :
# shutdown -h now

On a compute Node :
Go to to OVM Repository and access directly to the vServers vDisks.

On the repository :   
# cd /OVS/Repositories/000.........22/
# ls
Assemblies  ISOs  Templates  VirtualDisks  VirtualMachines

- Identify the vServer :  
# grep 'simple_name' VirtualMachines/*/*.cfg
VirtualMachines/000..........75/vm.cfg:OVM_simple_name = 'myvserver-1'
VirtualMachines/000..........48/vm.cfg:OVM_simple_name = 'myvserver-2'
VirtualMachines/000..........bb/vm.cfg:OVM_simple_name = 'myvserver-3'
VirtualMachines/000..........3f/vm.cfg:OVM_simple_name = 'ExalogicControlOpsCenterPC2'
VirtualMachines/000..........b7/vm.cfg:OVM_simple_name = 'mytemplatevserver'
VirtualMachines/000..........30/vm.cfg:OVM_simple_name = 'ExalogicControl'
VirtualMachines/000..........4b/vm.cfg:OVM_simple_name = 'ldapvserver'
VirtualMachines/000..........90/vm.cfg:OVM_simple_name = 'ExalogicControlOpsCenterPC1'

- Identify the vDisk :  
# grep -i disk VirtualMachines/000..........b7/vm.cfg
disk = ['file:/OVS/Repositories/000.........22/VirtualDisks/000..........b7.img,hda,w']
[root@elp01cn01 000.........22]# cd /OVS/Repositories/000.........22/VirtualDisks/

- Make a vDisk backup :  
# ls -l 000..........b7.img
-rw-r--r--+ 1 root root 6292504576 Jul 15 14:16 000..........b7.img
# cp 000..........b7.img 000..........b7.img.orig

- Create a new disk with the desired size :  
# dd if=/dev/zero of=System12G.img bs=5M count=2400
2400+0 records in
2400+0 records out
12582912000 bytes (13 GB) copied, 21.5651 seconds, 583 MB/s

- Copy vServer vDisk content into file newly created :  
# dd if=000..........b7.img of=System12G.img conv=notrunc,noerror
12290048+0 records in
12290048+0 records out
6292504576 bytes (6.3 GB) copied, 65.0138 seconds, 96.8 MB/s

- Replace vDisk with newly file :  
# mv System12G.img 000..........b7.img
mv: overwrite `000..........b7.img'? y

Restart the vServer and resize VolumeGroups
On OpsCenter Console :
- Connect to OpsCenter
- Go to “Vdc Management / mycloud / Accounts / myAccount”
- Select the vServer
- Click “start the server”.

On vServer
- Connect on vServer with root user and list the current disks shows in vServer :
# fdisk -l

Disk /dev/xvda: 12.5 GB, 12582912000 bytes
255 heads, 63 sectors/track, 1529 cylinders
Units = cylinders of 16065 * 512 = 8225280 bytes

    Device Boot      Start         End      Blocks   Id  System
/dev/xvda1   *           1          13      104391   83  Linux
/dev/xvda2              14         765     6040440   8e  Linux LVM

Disk /dev/dm-0: 5637 MB, 5637144576 bytes
255 heads, 63 sectors/track, 685 cylinders
Units = cylinders of 16065 * 512 = 8225280 bytes

Disk /dev/dm-0 doesn't contain a valid partition table

Disk /dev/dm-1: 536 MB, 536870912 bytes
255 heads, 63 sectors/track, 65 cylinders
Units = cylinders of 16065 * 512 = 8225280 bytes

Disk /dev/dm-1 doesn't contain a valid partition table


- Delete current partition and recreate new using the entire disk :
# fdisk /dev/xvda

The number of cylinders for this disk is set to 1529.
There is nothing wrong with that, but this is larger than 1024,
and could in certain setups cause problems with:
1) software that runs at boot time (e.g., old versions of LILO)
2) booting and partitioning software from other OSs
   (e.g., DOS FDISK, OS/2 FDISK)

Command (m for help): d
Partition number (1-4): 2

Command (m for help): n
Command action
   e   extended
   p   primary partition (1-4)
p
Partition number (1-4): 2
First cylinder (14-1529, default 14):
Using default value 14
Last cylinder or +size or +sizeM or +sizeK (14-1529, default 1529):
Using default value 1529

- Reboot to use the new partition :
# reboot -n

Broadcast message from root (pts/0) (Tue Jul 15 14:38:48 2014):

The system is going down for reboot NOW!

- Control the physical volume :
# pvdisplay
  --- Physical volume ---
  PV Name               /dev/xvda2
  VG Name               VolGroup00
  PV Size               5.76 GB / not usable 10.87 MB
  Allocatable           yes (but full)
  PE Size (KByte)       32768
  Total PE              184
  Free PE               0
  Allocated PE          184
  PV UUID               SaMlQo-Ct55-8IhX-ZEaf-rT4X-gISK-XEwdvc

- Resize the physical volume to use entire disk :
# pvresize /dev/xvda2
  Physical volume "/dev/xvda2" changed
  1 physical volume(s) resized / 0 physical volume(s) not resized

- Scan the volume group :
# vgs
  VG         #PV #LV #SN Attr   VSize  VFree
  VolGroup00   1   2   0 wz--n- 11.59G 5.84G

- Scan the logical Volumes in VolumeGroup :
# lvscan
  ACTIVE            '/dev/VolGroup00/LogVol00' [5.25 GB] inherit
  ACTIVE            '/dev/VolGroup00/LogVol01' [512.00 MB] inherit

- Extend the volume used for swap first :
# lvextend -L +1536M /dev/VolGroup00/LogVol01
  Extending logical volume LogVol01 to 2.00 GB
  Logical volume LogVol01 successfully resized

- Extend root filesystem with all the space free in volumeGroup :
# lvextend -l +100%FREE /dev/VolGroup00/LogVol00
  Extending logical volume LogVol00 to 9.59 GB
  Logical volume LogVol00 successfully resized

- Disable the swap :
# swapoff /dev/mapper/VolGroup00-LogVol01

- Recreate the swap with the new logical volume :
#  mkswap /dev/mapper/VolGroup00-LogVol01
Setting up swapspace version 1, size = 2147479 kB

- Enable the swap with the new logical volume :
# swapon /dev/mapper/VolGroup00-LogVol01

- Control new filesystem size :
# df -m
Filesystem           1M-blocks      Used Available Use% Mounted on
/dev/mapper/VolGroup00-LogVol00
                          9516      3449      5576  39% /
/dev/xvda1                  99        23        71  25% /boot
tmpfs                     3998         0      3998   0% /dev/shm

Note : Another approach can be made by adding a disk to system VG instead of resizing.